It's Tuesday!! So today for "Tackle-It Tuesday" I am going to show you how I made a fabric covered bulletin board. I had this old bulletin board I got at a Goodwill a couple of years ago and wanted to revamp it so it'll actually be cute!! Now I might use it in my room! Or maybe even my dorm!!! :)
SO here's how I did it!
STEP 1: Gather your supplies!!!
First, you need a bulletin board (NOOOO, really!?!)
Then I got primer (Valspar), acrylic paint (it was rather old), paintbrushes, newspaper, and screwdrivers (to pull out the staples in the back!)
 |
| Separationnnn!! :) |
STEP 2: Separate the frame from the actual board.

STEP 3: This is when I broke the process into two steps- I started with the painting- I put primer on it first- then, while it was drying, I covered the board.


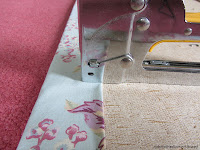
 STEP 4: We had this fabric stuffed in a drawer so it cost me nada! :) So you put the bulletin board on the fabric, then bring the edges on the board. I had a lot of extra fabric on the edges so I folded it so it wouldn't unravel or fray as easily, then I used a stapler to keep the fabric in place.
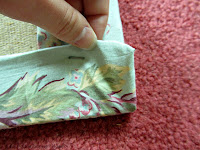
  QUICK TIP: When I finished stapling, the corners looked like the picture above- stretching over the edge. To fix this, I tucked the corner underneath and stapled it shut (see picture on right).
STEP 5: Go back and paint your frame the color you want!! I mixed it in a recycled cream cheese container and added a TAD of water. Then I painted it! After that, just wait for it to dry and decide if you want to add another coat. I ended up using 2 coats.
STEP 6: Put the frame back around the board and attach it! Once again, I used staples and stapled the heck out of it....
Now it's ready for a wall somewhere!! :)
And They Lived Happily Ever After...


No comments:
Post a Comment